
Introduction
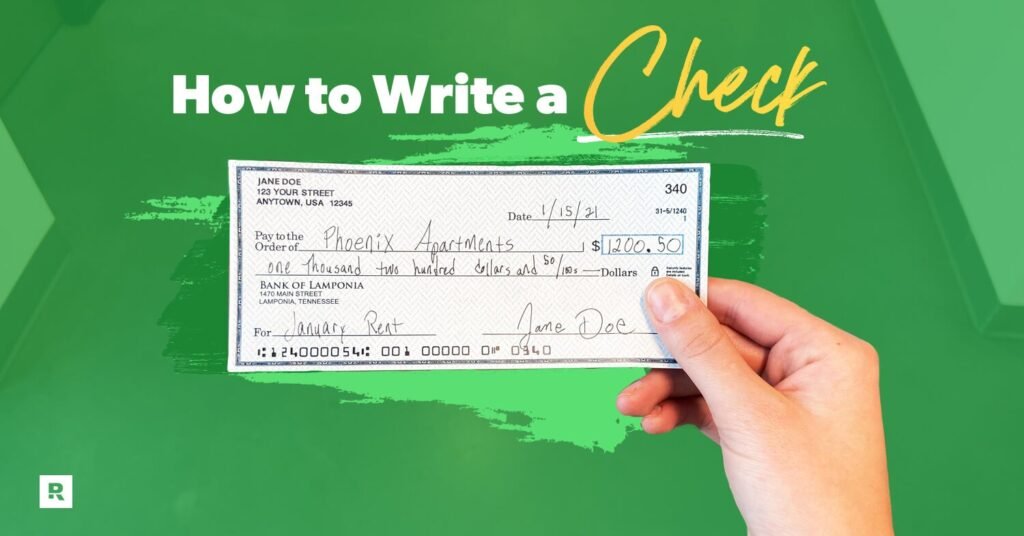
Although digital payment methods like online banking, mobile wallets, and credit cards have become increasingly popular, paper checks are still widely used for many financial transactions. Whether you’re paying rent, making a donation, settling a business invoice, or sending money securely, knowing how to write a check is a valuable financial skill.
Many people receive a checkbook from their bank but never actually learn how to fill out a check correctly. A small mistake can delay payment or even cause the check to be rejected. Fortunately, writing a check is much simpler than it may seem.
In this comprehensive guide, you’ll learn exactly how to write a check, understand each section of a check, avoid common mistakes, and discover useful tips to ensure your payments are processed smoothly every time.
Why Knowing How to Write a Check Still Matters
Despite the rise of digital banking, checks continue to play an important role in personal and business finances. Some landlords, government offices, schools, and contractors still prefer or require payment by check.
Checks also provide a clear paper trail of transactions. Since every deposited check is recorded by your bank, they’re useful for tracking expenses and keeping accurate financial records.
Another advantage is security. Unlike carrying large amounts of cash, a check can only be deposited or cashed by the intended recipient when written correctly.
Understanding the Parts of a Check
Before learning how to write a check, it’s important to understand the information printed on it. Every section has a specific purpose.
The upper-right corner contains the check number, which helps you track payments. You’ll also notice your name, address, and your bank’s information already printed on the check.
Near the bottom are the routing number, account number, and check number in magnetic ink. These numbers allow banks to process your payment accurately.
The blank spaces are where you’ll enter the date, recipient’s name, payment amount, written amount, memo, and signature.
Step 1: Write the Current Date
The first step is entering today’s date in the upper-right corner.
You can write it in several acceptable formats, such as:
- July 26, 2026
- 07/26/2026
- 26 July 2026
Using the correct date helps both you and the recipient keep accurate financial records. Avoid post-dating checks unless you have a specific agreement with the recipient, as many banks may process the check immediately regardless of the future date.
Always double-check that the date is correct before moving on.
Step 2: Write the Recipient’s Name
Next, locate the line that begins with “Pay to the Order of.”
Write the full legal name of the person or company receiving the payment. Be as accurate as possible.
For example:
- John Smith
- ABC Construction LLC
- City Electric Company
Avoid using nicknames unless you’re certain the recipient’s bank will accept them. An incorrect name may prevent the recipient from depositing the check.
Take your time and write neatly to avoid confusion.
Step 3: Write the Payment Amount in Numbers
In the small box on the right side of the check, write the payment amount using numbers.
Examples include:
- $75.50
- $1,250.00
- $980.25
Always include cents, even if the amount is an even dollar amount. For example, write $250.00 instead of just 250.
Keep the numbers close to the dollar sign to reduce the chance of someone altering the amount.
Step 4: Write the Amount in Words
This is one of the most important parts of writing a check.
On the long line below the recipient’s name, write the payment amount in words.
Examples include:
- Seventy-five and 50/100 Dollars
- One Thousand Two Hundred Fifty and 00/100 Dollars
- Nine Hundred Eighty and 25/100 Dollars
If there’s extra space remaining on the line, draw a straight line until the word “Dollars.” This prevents anyone from adding extra words later.
Banks generally rely on the written amount if it differs from the numerical amount, so make sure both match exactly.
Step 5: Add a Memo (Optional but Helpful)
The memo line is located near the bottom left corner of the check.
Although optional, it’s extremely useful for recording why you’re making the payment.
Examples include:
- July Rent
- Invoice #2058
- Car Payment
- Birthday Gift
- Utility Bill
Adding a memo helps both you and the recipient remember the purpose of the payment later.
Businesses especially appreciate detailed memo notes for accurate bookkeeping.
Step 6: Sign the Check
Your signature belongs on the line in the lower-right corner.
Without your signature, the check is not valid and cannot be processed by your bank.
Use the same signature you provided when opening your bank account.
Never sign blank checks. If someone gets hold of a signed blank check, they could potentially fill in any amount and recipient.
Always sign the check only after you’ve completed every other section.
Example of a Properly Written Check
Here’s a simple example:
Date:
July 26, 2026
Pay To:
John Smith
Amount Box:
$150.00
Written Amount:
One Hundred Fifty and 00/100 Dollars
Memo:
Monthly Lawn Service
Signature:
Your usual banking signature
This example contains every required element needed for successful processing.
Common Mistakes to Avoid
Many first-time check writers make simple errors that can delay payments.
One common mistake is mismatching the written amount and the numerical amount. Always verify both before signing.
Another mistake is leaving blank spaces on the amount lines. These gaps can make it easier for someone to alter the payment.
Poor handwriting can also create confusion during bank processing. Write clearly and legibly whenever possible.
Finally, forgetting to sign the check is surprisingly common. An unsigned check is considered invalid.
How to Void a Check Correctly
Sometimes you need to cancel a check before it’s used.
To void a check, write the word VOID in large letters across the front of the check using blue or black ink.
Do not cover the routing number or account number at the bottom if you’re providing the voided check for direct deposit or automatic payments.
Record the voided check number in your check register so your records remain accurate.
Tips for Writing Checks Safely
Writing checks safely can protect you from fraud and unauthorized changes.
Always use a pen with permanent blue or black ink rather than a pencil.
Never leave blank spaces after the recipient’s name or payment amount. Draw lines if necessary.
Store your checkbook in a secure location to prevent theft.
Review your monthly bank statements regularly to ensure every check matches your records.
If a check is lost or stolen, contact your bank immediately to request a stop payment.
When Should You Use a Check?
There are still many situations where checks remain the preferred payment method.
Landlords often accept checks for rent because they’re easy to document.
Many contractors and small businesses appreciate checks since they avoid certain electronic payment processing fees.
Government agencies frequently allow tax payments, permit fees, and other official transactions by check.
Checks are also commonly used for gifts, charitable donations, tuition payments, and estate planning.
Frequently Asked Questions
Can I write a check with a pencil?
No. Always use permanent blue or black ink. Pencil markings can be erased or altered.
What happens if I make a mistake?
If you make a significant mistake, it’s usually best to void the check and start over with a new one.
Can someone else cash my check?
Only the person or organization listed as the recipient can generally deposit or cash the check unless it has been properly endorsed or transferred according to bank policies.
How long is a check valid?
Many personal checks are considered valid for about six months, although individual banks may have different policies.
Do I need to write cents in words?
Yes. The standard method is writing cents as a fraction out of 100, such as 45/100.
Final Thoughts
Learning how to write a check is a practical financial skill that remains useful even in today’s digital world. Whether you’re paying bills, sending money, or handling business expenses, correctly completing every section of a check helps ensure your payment is processed quickly and securely.
The process is straightforward: write the date, enter the recipient’s name, fill in the amount both numerically and in words, include a memo if needed, and finish with your signature. Taking a few extra moments to review your work can prevent costly mistakes and protect against fraud.
Even if you only write a few checks each year, understanding the correct process builds confidence and ensures you’re prepared whenever a paper check is the best payment option. With the tips and best practices covered in this guide, you’ll be able to write checks accurately, securely, and professionally every time.

wellcome to glamnetworth i am rimsha razzaq and AI-Powered SEO , and containt writer with four years of experince i help website rank higher, grow traffic, and look amazing . my goal is to make SEO and web design simple and effective for everyone . Lets achieve more together|
