
Home Blog Page 16

How Many Ounces in a Pint? A Complete Guide to Pint-to-Ounce Conversions

0

If you have ever followed a recipe and suddenly wondered, How many ounces are in a pint?”, you are definitely not alone. This is one of those simple kitchen measurements that can become confusing because the answer depends on whether you are measuring a liquid or a dry ingredient, and which measurement system you are using.

For everyday cooking in the United States, the most common answer is 16 fluid ounces in 1 US liquid pint. That is the measurement most American recipes mean when they refer to a pint of milk, cream, water, juice, or another liquid.

However, there is more to the story. A pint is a unit of volume, while an ounce can refer to either fluid volume or weight. The difference matters, especially when you are baking or working with ingredients that have different densities. In this guide, we will explain exactly how many ounces are in a pint, how to convert pints to ounces, and how US and UK measurements differ.

How Many Ounces Are in a Pint?

In the United States, 1 liquid pint equals 16 fluid ounces. This is the standard conversion used for many common recipes and kitchen measurements.

So, if a recipe asks for one pint of water, you can measure it as 16 fluid ounces. Likewise, two pints equal 32 fluid ounces, while half a pint equals 8 fluid ounces.

The basic conversion is easy to remember:

1 US liquid pint = 16 US fluid ounces

This measurement is particularly useful when a recipe gives you a quantity in pints but your measuring cup or bottle is marked in fluid ounces. Instead of guessing, you can simply multiply the number of pints by 16.

For example, if you have 3 pints of liquid:

3 × 16 = 48 fluid ounces

Therefore, 3 US liquid pints contain 48 fluid ounces.

What Is a Pint?

A pint is a unit of volume used to measure liquids and, in some contexts, dry goods. It is commonly associated with cooking, beverages, and food packaging.

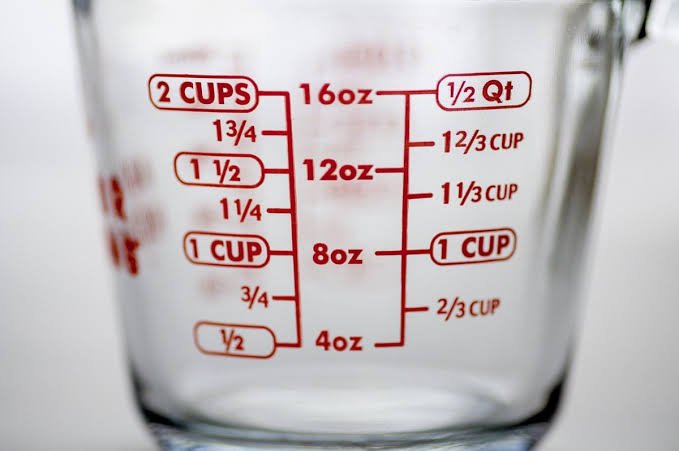
In the United States, the liquid pint is equal to two cups. Since one US cup contains 8 fluid ounces, the calculation is straightforward: 2 cups × 8 fluid ounces = 16 fluid ounces.

A pint is also one-half of a US liquid quart. A quart contains 32 fluid ounces, so dividing that amount by two gives you 16 fluid ounces per pint.

The word “pint” can sometimes cause confusion because its exact volume is not the same everywhere. The US pint and Imperial pint used in the United Kingdom are different sizes. This difference becomes important when you are reading recipes from another country or converting international measurements.

How Many Fluid Ounces Are in a US Pint?

A US liquid pint contains 16 US fluid ounces. This is the conversion you will usually need for American recipes.

The term “fluid ounce” is important here. A fluid ounce measures volume, not weight. That means 16 fluid ounces tells you how much space the liquid occupies rather than how heavy it is.

For example, if you measure 1 US pint of milk, you have 16 fluid ounces by volume. If you measure 1 US pint of water, you also have 16 fluid ounces by volume. The ingredients may have different weights because their densities are different, but the volume measurement remains the same.

This distinction is especially important in baking. If a recipe calls for 16 fluid ounces of a liquid, you should generally measure it using a liquid measuring cup or another volume-based measurement rather than assuming it weighs 16 ounces.

How Many Ounces Are in Half a Pint?

Half of a US liquid pint is 8 fluid ounces.

Because one pint contains 16 fluid ounces, dividing it by two gives:

16 ÷ 2 = 8 fluid ounces

This also means half a pint is equal to 1 US cup, because a standard US cup contains 8 fluid ounces.

Half-pint measurements are common in recipes, beverages, sauces, dairy products, and other kitchen situations. If you do not have a container marked with a half-pint measurement, you can simply use one standard measuring cup for most liquid ingredients.

Understanding these smaller conversions makes cooking much easier because you can move between pints, cups, and fluid ounces without needing to stop and search for a conversion every time.

How Many Ounces Are in 2 Pints?

Two US liquid pints contain 32 fluid ounces.

The calculation is:

2 pints × 16 fluid ounces = 32 fluid ounces

Two pints are also equal to 1 US liquid quart. This provides another easy way to remember the conversion.

For example, suppose a recipe requires 2 pints of broth. If your measuring container is marked in fluid ounces, you need 32 fluid ounces of broth.

The same calculation works for other amounts. Three pints equal 48 fluid ounces, four pints equal 64 fluid ounces, and five pints equal 80 fluid ounces.

Pint to Ounce Conversion Chart

If you regularly cook or bake, having a quick conversion chart can save time. Here are some common US liquid pint conversions:

PintsFluid Ounces
¼ pint4 fl oz
½ pint8 fl oz
1 pint16 fl oz
1½ pints24 fl oz
2 pints32 fl oz
3 pints48 fl oz
4 pints64 fl oz
5 pints80 fl oz
6 pints96 fl oz
8 pints128 fl oz

The easiest formula is simply:

Fluid ounces = pints × 16

If you are going in the opposite direction, use:

Pints = fluid ounces ÷ 16

For example, 40 fluid ounces divided by 16 equals 2.5 pints.

How Many Cups Are in a Pint?

One US liquid pint equals 2 cups.

Since one US cup contains 8 fluid ounces, you can see how the measurements connect:

1 pint = 2 cups = 16 fluid ounces

This is one of the most useful kitchen conversions to remember.

If you only have measuring cups available, you do not necessarily need a pint-sized container. You can measure one pint of liquid by using two standard 1-cup measures.

Likewise, half a pint is 1 cup, one-quarter pint is ½ cup, and two pints are 4 cups. These simple relationships are particularly useful when scaling recipes up or down.

US Pint vs. UK Imperial Pint

One of the biggest sources of confusion is the difference between a US pint and a UK Imperial pint.

A US liquid pint contains 16 US fluid ounces, while an Imperial pint contains 20 Imperial fluid ounces. An Imperial pint is also larger in terms of actual volume.

The Imperial pint is approximately 568 milliliters, while the US liquid pint is approximately 473 milliliters. Therefore, you should not automatically substitute a US pint for a UK pint when following an international recipe.

This distinction matters when reading recipes, beverage measurements, historical recipes, and instructions from British sources. Always check which measurement system the recipe uses before converting quantities.

If a British recipe says “one pint,” it generally means an Imperial pint. If an American recipe says “one pint,” it generally means a US pint.

Are Fluid Ounces the Same as Ounces?

No. Fluid ounces and ounces are different types of measurements.

A fluid ounce measures volume, while a regular ounce, often called an avoirdupois ounce, measures weight or mass. This difference can be easy to overlook because both use the word “ounce.”

For liquids, you will commonly see fl oz on measuring cups, bottles, and recipes. These measurements tell you the volume of the liquid.

For solid ingredients, ounces may refer to weight. For example, 8 ounces of flour by weight does not necessarily occupy the same volume as 8 fluid ounces of water.

This is why saying “a pint equals 16 ounces” without clarification can sometimes be misleading. The accurate statement for everyday US liquid measurement is 1 US liquid pint equals 16 US fluid ounces.

How to Convert Pints to Fluid Ounces

Converting pints to fluid ounces is very simple when you are using the US liquid measurement system.

Start with the number of pints and multiply it by 16.

Formula:

Pints × 16 = Fluid Ounces

Here are a few examples:

1 pint:
1 × 16 = 16 fluid ounces

2 pints:
2 × 16 = 32 fluid ounces

2.5 pints:
2.5 × 16 = 40 fluid ounces

4 pints:
4 × 16 = 64 fluid ounces

The reverse conversion is just as easy. If you know the number of fluid ounces and want to find pints, divide by 16.

For example:

48 fluid ounces ÷ 16 = 3 pints

Once you remember the number 16, most everyday pint-to-ounce calculations take only a few seconds.

How Many Ounces Are in a Pint of Different Ingredients?

A pint always represents a particular volume within a measurement system, but the weight of a pint can vary depending on the ingredient.

For example, a pint of water and a pint of cooking oil occupy the same volume if both are measured as US liquid pints. However, they do not necessarily weigh the same because water and oil have different densities.

This is why you should be careful when a recipe switches between volume and weight measurements. A pint of flour is not equivalent to 16 ounces of flour by weight simply because a pint contains 16 fluid ounces.

For liquids, the easiest approach is to use fluid-ounce or cup measurements. For solid ingredients, especially when precision matters, a kitchen scale can provide a more reliable measurement.

Why Pint-to-Ounce Conversions Matter in Cooking

Knowing how many ounces are in a pint can make everyday cooking much more convenient. Recipes often use different measurement systems depending on where they were created, and being able to convert between them helps prevent mistakes.

Imagine finding a recipe that calls for one pint of cream, but your measuring jug only shows fluid ounces. Knowing that a US liquid pint is 16 fluid ounces means you can measure the correct quantity immediately.

It is also useful when doubling or reducing recipes. If a soup recipe calls for 2 pints of broth and you want to make half the recipe, you know that you need 1 pint, or 16 fluid ounces.

These conversions are especially helpful for home cooks who use recipes from different websites, cookbooks, or countries. A little measurement knowledge can make the entire cooking process smoother.

Common Mistakes When Measuring Pints and Ounces

One common mistake is assuming that every pint contains exactly 16 ounces regardless of the country. As discussed earlier, the US liquid pint and Imperial pint are different measurements.

Another mistake is confusing fluid ounces with ounces by weight. Although both use the word “ounce,” they measure different things. This can lead to inaccurate results when measuring ingredients such as flour, sugar, butter, or other solids.

People also sometimes assume that a pint always has the same weight. It does not. The weight depends on the ingredient’s density. Volume and weight are related, but they are not interchangeable measurements.

The easiest way to avoid these mistakes is to identify the type of measurement first. Ask whether the recipe is using a US liquid pint, Imperial pint, dry pint, fluid ounces, or weight ounces. Once you know that, the conversion becomes much clearer.

Quick Answer: How Many Ounces in a Pint?

For most everyday American cooking:

1 US liquid pint = 16 US fluid ounces

You can also remember these related conversions:

½ pint = 8 fluid ounces = 1 cup

1 pint = 16 fluid ounces = 2 cups

2 pints = 32 fluid ounces = 1 quart

4 pints = 64 fluid ounces = 2 quarts

These are the measurements you will encounter most often in US recipes and kitchen instructions.

Final Thoughts on How Many Ounces Are in a Pint

So, how many ounces are in a pint? The straightforward answer is 16 fluid ounces in one US liquid pint. This is the standard conversion you should use for most American recipes involving liquids.

The important thing is to remember that measurement systems can vary. A US pint is not the same size as a UK Imperial pint, and fluid ounces are not the same thing as ounces by weight. Understanding those differences will help you avoid confusion when cooking, baking, shopping, or converting recipes.

For quick reference, keep this simple formula in mind:

Pints × 16 = US fluid ounces

Once you memorize that, converting pints to ounces becomes almost effortless. Whether you are measuring milk for a recipe, calculating the amount of broth for a soup, or adjusting a drink recipe, knowing the relationship between pints and fluid ounces is a small piece of kitchen knowledge that can save you a lot of time and prevent measurement mistakes.

How Many Cups in a Pint? The Ultimate Easy Guide to Accurate Kitchen Conversions

0

If you have ever started following a recipe and suddenly wondered, How many cups in a pint?”, you are definitely not alone. Kitchen measurements can be surprisingly confusing, especially when recipes use cups, pints, quarts, gallons, tablespoons, and ounces all in the same set of instructions.

The good news is that the basic conversion is simple. In the United States, 1 pint equals 2 cups. Once you remember this straightforward relationship, many common kitchen measurements become much easier to understand.

In this complete guide, we will explain how many cups are in a pint, how the conversion works, how pints relate to other measurements, and how you can quickly calculate different amounts when cooking or baking. We will also cover the difference between liquid and dry measurements and explain why international recipes can sometimes create confusion.

How Many Cups in a Pint?

The simple answer is 2 cups in 1 US pint. This is the standard liquid measurement used in many American recipes and is one of the most useful kitchen conversions to remember.

So, if a recipe calls for 1 pint of milk, you can measure it using 2 cups of milk. Likewise, if you have 2 cups of water, milk, cream, or another liquid, you have the equivalent of 1 US liquid pint.

The basic formula is:

1 pint = 2 cups

This means that you can easily multiply or divide the measurement depending on what your recipe requires. For example, half a pint is 1 cup, while 2 pints equal 4 cups.

Quick Pint to Cup Conversion Chart

A conversion chart can make cooking much easier, particularly when you are working with a recipe that uses unfamiliar quantities. Instead of doing the math each time, you can simply look at the equivalent measurement.

Here is a quick pint-to-cup conversion chart for US liquid measurements:

PintsCups
¼ pint½ cup
½ pint1 cup
1 pint2 cups
1½ pints3 cups
2 pints4 cups
3 pints6 cups
4 pints8 cups
5 pints10 cups
6 pints12 cups
8 pints16 cups

The pattern is easy to remember because you simply multiply the number of pints by 2. For instance, 3 pints multiplied by 2 gives you 6 cups.

This conversion is particularly useful when preparing soups, sauces, drinks, desserts, and other recipes that use liquid ingredients. It can also help when scaling a recipe up or down for a different number of servings.

How to Convert Pints to Cups

Converting pints to cups is one of the easiest kitchen measurement calculations. Since one US pint contains two cups, all you need to do is multiply the number of pints by 2.

The formula is:

Cups = Pints × 2

For example, if you have 4 pints and want to know how many cups that represents, multiply 4 by 2. The answer is 8 cups.

The same method works with smaller quantities. If you have ½ pint, multiply 0.5 by 2 and you get 1 cup. If you have 1½ pints, multiply 1.5 by 2 and you get 3 cups.

How Many Cups Are in Half a Pint?

There is 1 cup in half of a US pint. This is an especially useful conversion because recipes frequently call for half-pint quantities.

Think of a pint as a container divided into two equal cups. If you remove one cup, the remaining amount is another cup, which is half a pint.

For example, if a recipe requires half a pint of heavy cream, you can simply measure 1 cup of heavy cream. You do not need a special pint-sized measuring container to get the correct amount.

Remembering this small conversion can save time when cooking. It is also useful when adjusting recipes that were originally designed for larger quantities.

How Many Cups Are in 2 Pints?

There are 4 cups in 2 US pints. Since every pint contains 2 cups, multiplying 2 pints by 2 cups gives you 4 cups.

This is also easy to understand through larger kitchen measurements. In the US customary system, 2 pints make up 1 quart, and 1 quart contains 4 cups.

For example, if you are preparing a large batch of soup and the recipe requires 2 pints of broth, you can measure out 4 cups instead. The amount is exactly the same when using US liquid measurements.

This conversion becomes even more helpful when increasing a recipe. If a recipe originally calls for 1 pint but you want to double the batch, you will need 2 pints, which equals 4 cups.

How Many Cups Are in a Quart?

A US liquid quart contains 4 cups. This relationship is closely connected to the pint conversion and is worth remembering if you regularly cook or bake.

The basic sequence is:

1 quart = 2 pints = 4 cups

This means that every quart contains twice as many pints and four times as many cups. For example, if you have 3 quarts of liquid, you have 6 pints or 12 cups.

Understanding how these measurements fit together makes it much easier to adjust recipes. You can move between cups, pints, and quarts without needing to search for a conversion every time.

How Many Cups Are in a Gallon?

In the US customary system, 1 gallon contains 16 cups. That gallon can be broken down into smaller measurements that are easy to remember.

The relationship is:

1 gallon = 4 quarts = 8 pints = 16 cups

This sequence provides a simple way to understand how common US liquid measurements connect. If you know that one pint equals two cups, you can work your way up to larger quantities.

For example, if you have 2 gallons of liquid, you have 32 cups. This type of conversion can be helpful when preparing large quantities of beverages, catering food, making homemade sauces, or scaling recipes for parties and events.

Pint, Cup, Quart, and Gallon Conversion Guide

The US liquid measurement system becomes much easier once you understand the relationship between its most common units. Cups, pints, quarts, and gallons are all connected.

Here is the basic structure:

1 pint = 2 cups

1 quart = 2 pints = 4 cups

1 gallon = 4 quarts = 8 pints = 16 cups

You can use these relationships to move from one measurement to another. For example, if you know a recipe needs 8 cups of liquid, you can recognize that this equals 4 pints, 2 quarts, or half a gallon.

This is particularly helpful when you do not have the exact measuring container required by a recipe. You can often substitute another measuring unit as long as you know the correct conversion.

Is a Pint the Same for Dry and Liquid Ingredients?

This is where things can become a little more complicated. In the United States, a liquid pint equals 2 cups, but dry measurements do not always work exactly the same way.

A liquid pint measures volume, such as water, milk, juice, or oil. A dry pint is also a unit of volume, but it is used for certain dry goods and has a different volume than the US liquid pint. Therefore, you should not automatically assume that a dry pint weighs or measures exactly like a liquid pint.

This distinction matters because volume and weight are not the same thing. A pint tells you about volume, while ounces can refer either to fluid volume or weight depending on the context.

For everyday recipes involving liquids, the safest rule is to use the standard US conversion of 1 liquid pint = 2 cups. For dry ingredients, follow the recipe’s specific measurement instructions whenever possible.

How Many Fluid Ounces Are in a Pint?

One US liquid pint contains 16 fluid ounces. Since one cup contains 8 US fluid ounces, the relationship makes perfect sense:

1 pint = 16 fluid ounces = 2 cups

This is another useful way to double-check your measurements. If a recipe calls for 16 fluid ounces of a liquid, you know that it equals 1 pint or 2 cups.

For example, 8 fluid ounces is equal to 1 cup, while 16 fluid ounces equals 2 cups. If you have 32 fluid ounces, that is equal to 2 pints or 4 cups.

Knowing the connection between cups, pints, and fluid ounces can make it much easier to interpret recipes, drink measurements, and food labels.

US Pint vs. UK Pint: What Is the Difference?

One important detail is that not every pint is the same around the world. The US and UK use different definitions for a pint, which means international recipes can cause confusion.

A US liquid pint equals 2 US cups, while a UK imperial pint is larger. A UK imperial pint is approximately 20 UK fluid ounces, compared with 16 US fluid ounces in a US pint.

The difference becomes important when following a recipe from another country. If you are using an American recipe, the standard rule is 1 US pint = 2 US cups. If you are following a British recipe, check whether it uses imperial measurements before converting the ingredients.

This is one reason online recipes can sometimes produce unexpected results. Always pay attention to whether the recipe is written using US customary measurements, UK imperial measurements, or the metric system.

Common Examples of Pint-to-Cup Conversions

Knowing the basic formula is helpful, but seeing real examples can make the process even easier. Suppose a recipe calls for 3 pints of chicken broth. You would multiply 3 by 2, giving you 6 cups.

If a recipe requires ½ pint of milk, that equals 1 cup. If it calls for 2½ pints, the answer is 5 cups.

Here are several common examples:

¼ pint = ½ cup

½ pint = 1 cup

1 pint = 2 cups

1½ pints = 3 cups

2 pints = 4 cups

2½ pints = 5 cups

3 pints = 6 cups

The key is to remember the simple relationship rather than trying to memorize every possible conversion. Once you know that 1 pint equals 2 cups, you can calculate almost any amount quickly.

Why Knowing Kitchen Conversions Is Useful

Understanding basic kitchen conversions is more than just a way to solve a recipe question. It can help you cook more confidently and avoid mistakes when adjusting ingredient quantities.

Conversions are especially useful when you do not have the exact measuring tool mentioned in a recipe. If you do not have a pint measuring container but have standard measuring cups, knowing that 1 pint equals 2 cups gives you an easy alternative.

Conversions are also valuable when doubling or reducing recipes. For example, if a recipe serves four people and calls for 1 pint of soup, you would need 2 pints for eight people. That equals 4 cups.

Having a few core measurements memorized can make cooking faster and more intuitive. You will spend less time searching for conversions and more time focusing on the recipe itself.

Easy Tips for Measuring a Pint Correctly

For liquid ingredients, use a liquid measuring cup whenever possible. These measuring cups are designed to make it easier to measure volume accurately, particularly when the ingredient reaches a specific level.

Place the measuring cup on a flat surface and check the measurement at eye level. This helps prevent errors caused by looking at the measurement from an angle.

If your recipe calls for 1 US liquid pint, remember that you can measure 2 US cups. For greater accuracy, especially when baking, avoid estimating the amount by simply filling a random container. Precise measurements can make a noticeable difference in the final result.

Final Thoughts on How Many Cups in a Pint

So, how many cups in a pint? The answer is simple: 1 US liquid pint equals 2 cups. This is one of the most useful kitchen conversions to remember and can make cooking and recipe preparation much easier.

Once you know this basic relationship, you can quickly calculate larger and smaller quantities. Half a pint is 1 cup, 2 pints are 4 cups, 4 pints are 8 cups, and 8 pints are 16 cups, which equals 1 US gallon.

Just remember that measurements can differ between countries and between liquid and dry ingredients. For standard US liquid recipes, however, the rule is easy: one pint equals two cups. Keep that conversion in mind, and you will be able to handle many everyday kitchen measurement questions with confidence.

How to Write a Poem: A Complete Beginner’s Guide to Creating Meaningful Poetry

Poetry is one of the oldest and most expressive forms of writing. It allows people to communicate emotions, ideas, and experiences in a way that ordinary writing often cannot. Whether you’re writing about love, nature, loss, happiness, or personal growth, a poem gives you the freedom to express yourself creatively.

Many beginners believe poetry follows strict rules, but that’s only partially true. While some poems use traditional structures like sonnets or haikus, many modern poems have no fixed format at all. The beauty of poetry lies in its flexibility and emotional depth.

If you’ve ever wondered how to write a poem, this guide will walk you through every important step. From finding inspiration to polishing your final draft, you’ll learn practical techniques that make poetry easier and more enjoyable.


Understand What Makes a Poem Different

A poem is much more than a collection of beautiful words. It captures feelings, paints vivid images, and often says more with fewer words than an entire page of prose. Unlike essays or stories, poems focus heavily on rhythm, emotion, and imagination.

One of the defining features of poetry is its ability to create powerful mental images. Instead of simply telling readers what happened, poetry helps them see, hear, and feel the experience. Good poets often rely on sensory language to make every line memorable.

Another important characteristic is that poetry encourages interpretation. Different readers may discover different meanings in the same poem, making poetry a deeply personal experience for both the writer and the audience.


Find Inspiration Before You Start Writing

Every great poem begins with inspiration. Fortunately, inspiration can come from almost anywhere. Nature, conversations, memories, books, music, dreams, and everyday experiences all provide excellent material for poetry.

Don’t wait for the “perfect idea” before you begin. Sometimes the best poems start with a simple observation, such as watching rain fall, hearing birds sing, or remembering a childhood moment. Small experiences often lead to the most meaningful poems.

Keeping a notebook or digital journal is a smart habit for aspiring poets. Write down interesting thoughts, unusual phrases, emotions, or observations throughout your day. These notes can later become the foundation of an original poem.


Choose a Theme or Central Message

Before writing your first line, decide what your poem is about. Every strong poem has a central theme that guides the writing process. Your theme could be love, hope, fear, friendship, family, success, loneliness, or anything that matters to you.

Having a clear focus helps your poem stay organized. Instead of jumping between unrelated ideas, each line should contribute to the overall message. Readers appreciate poems that feel connected from beginning to end.

Remember that your theme doesn’t need to be complicated. Even simple topics become powerful when expressed honestly. Authentic emotions often have a stronger impact than overly complex ideas.


Select the Type of Poem You Want to Write

There are many different forms of poetry, and choosing one can make writing much easier. Beginners often enjoy free verse because it doesn’t require a specific rhyme scheme or syllable count.

If you enjoy structure, you might try writing a haiku, which traditionally contains three lines with a 5-7-5 syllable pattern. Limericks are another fun option, using a playful rhythm and rhyme scheme that makes them enjoyable to read.

Rhyming poems remain popular as well, although modern poetry frequently avoids rhyme altogether. The most important decision is choosing a style that matches your subject and writing preferences.


Use Strong Imagery and Descriptive Language

Imagery is one of the most powerful tools in poetry. Instead of telling readers that something was beautiful, describe what they would actually see, hear, smell, taste, or touch. This makes your poem feel alive.

For example, instead of writing, “The garden looked nice,” you might say, “Golden sunflowers stretched toward the morning sky while butterflies danced above blooming roses.” Specific descriptions create stronger emotional connections.

Metaphors, similes, and personification also enrich poetry. Comparing emotions to storms, giving the wind a voice, or describing hope as a rising sunrise helps readers visualize abstract ideas more clearly.


Focus on Rhythm and Word Choice

Every word matters in poetry. Unlike long-form writing, poems often communicate powerful messages using very few words. Choosing precise vocabulary makes every line stronger.

Read your poem aloud while writing. This helps you notice awkward phrasing, repetitive words, or lines that interrupt the natural flow. Good poetry sounds smooth when spoken, even if it doesn’t rhyme.

Don’t be afraid to replace ordinary words with more vivid alternatives. Instead of “walked,” consider “wandered,” “strolled,” or “marched.” Small vocabulary improvements can significantly enhance your poem’s overall quality.


Don’t Worry About Rhyming

Many beginners mistakenly believe every poem must rhyme. In reality, countless successful poems use no rhyme at all. Free verse has become one of the most popular styles because it prioritizes natural expression over strict rules.

If rhyme feels forced, leave it out. Forced rhymes often weaken the meaning of a poem by encouraging awkward word choices. Focus first on expressing your ideas honestly and clearly.

If you enjoy rhyming, use it naturally. A gentle rhyme pattern can create musical flow without overwhelming the message. The poem should always prioritize meaning over matching sounds.


Edit and Improve Your Poem

Your first draft is rarely your best draft. Nearly every experienced poet spends time revising before considering a poem complete. Editing helps remove unnecessary words and strengthen weaker lines.

Look for repeated ideas, confusing phrases, and overly complicated language. Ask yourself whether every line contributes to the overall theme. If a sentence doesn’t improve the poem, consider removing it.

Reading your poem aloud several times is one of the best editing techniques. You’ll quickly notice where rhythm breaks, words repeat too often, or emotions fail to connect with readers.


Read More Poetry to Become a Better Poet

One of the fastest ways to improve your writing is by reading poems from different authors. Exposure to various styles teaches you new techniques, vocabulary, and creative approaches.

Don’t limit yourself to one type of poetry. Explore classic literature, modern free verse, spoken word poetry, and contemporary collections. Every poet offers something unique that can influence your own writing.

As you read, pay attention to imagery, line breaks, rhythm, and emotional impact. Instead of copying another poet’s style, learn why their poems are effective and apply those lessons to your own work.


Practice Writing Regularly

Poetry improves with consistent practice. You don’t need to write a masterpiece every day. Even writing a few lines daily helps develop creativity and confidence.

Challenge yourself with different writing prompts. Describe a season, write about a favorite memory, imagine a conversation with the moon, or capture the feeling of watching a sunset. These exercises strengthen your poetic thinking.

Don’t judge your early work too harshly. Every successful poet started as a beginner. Improvement comes from writing frequently, experimenting with new ideas, and learning from each poem you create.


Common Mistakes Beginners Should Avoid

Many new poets try too hard to sound sophisticated. Using overly complicated words doesn’t automatically make a poem better. Clear, honest language often creates a stronger emotional connection.

Another common mistake is trying to imitate famous poets too closely. Inspiration is valuable, but originality is even more important. Your unique voice is what makes your poetry memorable.

Finally, avoid rushing the writing process. Great poems often require time, reflection, and multiple revisions. Be patient with yourself and allow your creativity to develop naturally.


Final Thoughts

Learning how to write a poem is a rewarding journey that combines creativity, observation, and emotional expression. There is no single formula for writing the perfect poem because every poet brings a unique perspective and voice to the page. The more you write, the more confident and skilled you’ll become.

Start with simple ideas, focus on honest emotions, and don’t be afraid to experiment with different styles. Use vivid imagery, choose meaningful words, and revise your work until it communicates exactly what you want readers to feel. Every poem you write is an opportunity to improve your craft.

Most importantly, remember that poetry is about connection. Whether you’re writing for yourself, friends, or a wider audience, your words have the power to inspire, comfort, and spark imagination. Keep practicing, stay curious, and enjoy the creative process. Every great poet began with a single line, and yours could be the start of something extraordinary.

How to Write a Check: A Complete Step-by-Step Guide for Beginners

Introduction

Although digital payment methods like online banking, mobile wallets, and credit cards have become increasingly popular, paper checks are still widely used for many financial transactions. Whether you’re paying rent, making a donation, settling a business invoice, or sending money securely, knowing how to write a check is a valuable financial skill.

Many people receive a checkbook from their bank but never actually learn how to fill out a check correctly. A small mistake can delay payment or even cause the check to be rejected. Fortunately, writing a check is much simpler than it may seem.

In this comprehensive guide, you’ll learn exactly how to write a check, understand each section of a check, avoid common mistakes, and discover useful tips to ensure your payments are processed smoothly every time.


Why Knowing How to Write a Check Still Matters

Despite the rise of digital banking, checks continue to play an important role in personal and business finances. Some landlords, government offices, schools, and contractors still prefer or require payment by check.

Checks also provide a clear paper trail of transactions. Since every deposited check is recorded by your bank, they’re useful for tracking expenses and keeping accurate financial records.

Another advantage is security. Unlike carrying large amounts of cash, a check can only be deposited or cashed by the intended recipient when written correctly.


Understanding the Parts of a Check

Before learning how to write a check, it’s important to understand the information printed on it. Every section has a specific purpose.

The upper-right corner contains the check number, which helps you track payments. You’ll also notice your name, address, and your bank’s information already printed on the check.

Near the bottom are the routing number, account number, and check number in magnetic ink. These numbers allow banks to process your payment accurately.

The blank spaces are where you’ll enter the date, recipient’s name, payment amount, written amount, memo, and signature.


Step 1: Write the Current Date

The first step is entering today’s date in the upper-right corner.

You can write it in several acceptable formats, such as:

  • July 26, 2026
  • 07/26/2026
  • 26 July 2026

Using the correct date helps both you and the recipient keep accurate financial records. Avoid post-dating checks unless you have a specific agreement with the recipient, as many banks may process the check immediately regardless of the future date.

Always double-check that the date is correct before moving on.


Step 2: Write the Recipient’s Name

Next, locate the line that begins with “Pay to the Order of.”

Write the full legal name of the person or company receiving the payment. Be as accurate as possible.

For example:

  • John Smith
  • ABC Construction LLC
  • City Electric Company

Avoid using nicknames unless you’re certain the recipient’s bank will accept them. An incorrect name may prevent the recipient from depositing the check.

Take your time and write neatly to avoid confusion.


Step 3: Write the Payment Amount in Numbers

In the small box on the right side of the check, write the payment amount using numbers.

Examples include:

  • $75.50
  • $1,250.00
  • $980.25

Always include cents, even if the amount is an even dollar amount. For example, write $250.00 instead of just 250.

Keep the numbers close to the dollar sign to reduce the chance of someone altering the amount.


Step 4: Write the Amount in Words

This is one of the most important parts of writing a check.

On the long line below the recipient’s name, write the payment amount in words.

Examples include:

  • Seventy-five and 50/100 Dollars
  • One Thousand Two Hundred Fifty and 00/100 Dollars
  • Nine Hundred Eighty and 25/100 Dollars

If there’s extra space remaining on the line, draw a straight line until the word “Dollars.” This prevents anyone from adding extra words later.

Banks generally rely on the written amount if it differs from the numerical amount, so make sure both match exactly.


Step 5: Add a Memo (Optional but Helpful)

The memo line is located near the bottom left corner of the check.

Although optional, it’s extremely useful for recording why you’re making the payment.

Examples include:

  • July Rent
  • Invoice #2058
  • Car Payment
  • Birthday Gift
  • Utility Bill

Adding a memo helps both you and the recipient remember the purpose of the payment later.

Businesses especially appreciate detailed memo notes for accurate bookkeeping.


Step 6: Sign the Check

Your signature belongs on the line in the lower-right corner.

Without your signature, the check is not valid and cannot be processed by your bank.

Use the same signature you provided when opening your bank account.

Never sign blank checks. If someone gets hold of a signed blank check, they could potentially fill in any amount and recipient.

Always sign the check only after you’ve completed every other section.


Example of a Properly Written Check

Here’s a simple example:

Date:
July 26, 2026

Pay To:
John Smith

Amount Box:
$150.00

Written Amount:
One Hundred Fifty and 00/100 Dollars

Memo:
Monthly Lawn Service

Signature:
Your usual banking signature

This example contains every required element needed for successful processing.


Common Mistakes to Avoid

Many first-time check writers make simple errors that can delay payments.

One common mistake is mismatching the written amount and the numerical amount. Always verify both before signing.

Another mistake is leaving blank spaces on the amount lines. These gaps can make it easier for someone to alter the payment.

Poor handwriting can also create confusion during bank processing. Write clearly and legibly whenever possible.

Finally, forgetting to sign the check is surprisingly common. An unsigned check is considered invalid.


How to Void a Check Correctly

Sometimes you need to cancel a check before it’s used.

To void a check, write the word VOID in large letters across the front of the check using blue or black ink.

Do not cover the routing number or account number at the bottom if you’re providing the voided check for direct deposit or automatic payments.

Record the voided check number in your check register so your records remain accurate.


Tips for Writing Checks Safely

Writing checks safely can protect you from fraud and unauthorized changes.

Always use a pen with permanent blue or black ink rather than a pencil.

Never leave blank spaces after the recipient’s name or payment amount. Draw lines if necessary.

Store your checkbook in a secure location to prevent theft.

Review your monthly bank statements regularly to ensure every check matches your records.

If a check is lost or stolen, contact your bank immediately to request a stop payment.


When Should You Use a Check?

There are still many situations where checks remain the preferred payment method.

Landlords often accept checks for rent because they’re easy to document.

Many contractors and small businesses appreciate checks since they avoid certain electronic payment processing fees.

Government agencies frequently allow tax payments, permit fees, and other official transactions by check.

Checks are also commonly used for gifts, charitable donations, tuition payments, and estate planning.


Frequently Asked Questions

Can I write a check with a pencil?

No. Always use permanent blue or black ink. Pencil markings can be erased or altered.

What happens if I make a mistake?

If you make a significant mistake, it’s usually best to void the check and start over with a new one.

Can someone else cash my check?

Only the person or organization listed as the recipient can generally deposit or cash the check unless it has been properly endorsed or transferred according to bank policies.

How long is a check valid?

Many personal checks are considered valid for about six months, although individual banks may have different policies.

Do I need to write cents in words?

Yes. The standard method is writing cents as a fraction out of 100, such as 45/100.


Final Thoughts

Learning how to write a check is a practical financial skill that remains useful even in today’s digital world. Whether you’re paying bills, sending money, or handling business expenses, correctly completing every section of a check helps ensure your payment is processed quickly and securely.

The process is straightforward: write the date, enter the recipient’s name, fill in the amount both numerically and in words, include a memo if needed, and finish with your signature. Taking a few extra moments to review your work can prevent costly mistakes and protect against fraud.

Even if you only write a few checks each year, understanding the correct process builds confidence and ensures you’re prepared whenever a paper check is the best payment option. With the tips and best practices covered in this guide, you’ll be able to write checks accurately, securely, and professionally every time.

Rolex Explorer: The Ultimate Guide to Rolex’s Legendary Adventure Watch

Introduction

The Rolex Explorer is one of the most iconic watches ever created. While many luxury watches focus on flashy designs and complicated features, the Explorer has built its reputation through simplicity, durability, and exceptional craftsmanship. It represents the spirit of exploration and has become a favorite among adventurers, professionals, and watch collectors alike.

Originally inspired by mountaineering expeditions, the Rolex Explorer is designed to perform in the toughest environments while maintaining a timeless appearance. Unlike many luxury sports watches, it avoids unnecessary complexity and instead emphasizes reliability, readability, and comfort. This balance has helped the Explorer remain relevant for decades.

Whether you’re considering buying your first Rolex or you’re simply curious about one of the brand’s most respected collections, this guide covers everything you need to know about the Rolex Explorer, from its history and features to its investment potential and buying tips.


The History of the Rolex Explorer

The story of the Rolex Explorer begins with one of the greatest achievements in mountaineering history. In 1953, Sir Edmund Hillary and Tenzing Norgay successfully reached the summit of Mount Everest. Rolex watches accompanied the expedition, helping establish the brand’s reputation for producing durable and dependable timepieces.

Following this historic event, Rolex officially introduced the Explorer collection. The watch was created to celebrate human achievement and the desire to push beyond ordinary limits. It wasn’t designed as a fashion accessory but as a practical tool that could withstand harsh conditions.

Over the decades, the Explorer has evolved with modern technology while preserving its original identity. The classic black dial, highly legible hour markers, and famous 3-6-9 numerals have remained signature elements, making the watch instantly recognizable among enthusiasts.


What Makes the Rolex Explorer Unique?

One of the biggest reasons collectors admire the Rolex Explorer is its focus on functionality. Every design choice serves a practical purpose rather than being purely decorative.

The watch features an incredibly clean dial that prioritizes readability. The large luminous markers and Mercedes-style hands allow users to read the time easily in both bright daylight and complete darkness. This straightforward design has become one of Rolex’s most iconic looks.

Another defining characteristic is versatility. The Explorer looks equally appropriate with hiking gear, business attire, or casual clothing. Unlike some luxury watches that feel too formal or too sporty, the Explorer fits almost every occasion.

Finally, the Explorer embodies understated luxury. It doesn’t scream for attention, yet those familiar with fine watches immediately recognize its quality and heritage.


Rolex Explorer Design and Build Quality

Rolex is known for manufacturing nearly every component of its watches in-house, and the Explorer is no exception. Every detail is engineered for precision and longevity.

The case is crafted from Rolex’s highly corrosion-resistant Oystersteel. This premium stainless steel maintains its appearance for years, even under challenging conditions. Combined with the Oyster bracelet, the watch delivers outstanding durability and comfort.

The Explorer also features a scratch-resistant sapphire crystal, protecting the dial from everyday wear. The Twinlock waterproof crown provides water resistance suitable for swimming, outdoor adventures, and daily activities.

Despite its rugged construction, the Explorer maintains a slim profile that sits comfortably on the wrist. Many owners appreciate that it feels lightweight compared to larger sports watches while still offering a substantial presence.


Movement and Performance

At the heart of every Rolex Explorer is one of Rolex’s highly respected automatic movements. These self-winding calibers are engineered for exceptional accuracy, efficiency, and long-term reliability.

Modern Explorer models use advanced technologies such as the Chronergy escapement, which improves energy efficiency while maintaining outstanding precision. Rolex also equips the movement with its Parachrom hairspring, making it more resistant to shocks and magnetic interference.

Each Explorer undergoes Rolex’s demanding Superlative Chronometer testing after assembly. This certification guarantees impressive accuracy that exceeds standard Swiss chronometer requirements.

Owners also benefit from a power reserve of approximately 70 hours on current models, allowing the watch to continue running even after being left unworn for nearly three days.


Rolex Explorer Models

Over the years, Rolex has introduced several Explorer variations while maintaining the collection’s classic identity.

The Explorer 36mm is often considered the purest version of the original design. Its balanced proportions appeal to collectors who appreciate vintage-inspired sizing and timeless elegance.

The Explorer 40mm offers a slightly larger case that meets modern preferences without sacrificing comfort. It provides improved wrist presence while preserving the traditional Explorer aesthetic.

Rolex also offers the Explorer II, which serves a different purpose. Unlike the standard Explorer, the Explorer II includes a fixed 24-hour bezel and an additional GMT hand, making it especially useful for travelers, cave explorers, and professionals working in environments where distinguishing day from night can be difficult.


Why Watch Collectors Love the Rolex Explorer

The Rolex Explorer has earned enormous respect within the watch community because of its authenticity. It wasn’t created to follow trends but to fulfill a genuine need for reliable performance in demanding conditions.

Collectors often praise the Explorer’s versatility. It can serve as an everyday watch, a travel companion, or even a formal dress watch depending on the occasion. Few luxury timepieces offer such flexibility.

Another reason for its popularity is its timeless design. While fashion trends come and go, the Explorer’s clean dial and balanced proportions have remained attractive for generations. Many enthusiasts believe it is one of the few watches that will never look outdated.

The Explorer also appeals to people who appreciate subtle luxury. It offers exceptional quality without the bold appearance associated with some other high-end sports watches.


Is the Rolex Explorer a Good Investment?

Many luxury watches have become valuable investment pieces, and the Rolex Explorer has demonstrated impressive value retention over the years.

Because Rolex carefully manages production, demand often exceeds supply. This limited availability contributes to strong resale values in both new and pre-owned markets.

Vintage Explorer references are particularly sought after by collectors. Well-preserved examples with original components can command significant premiums due to their rarity and historical importance.

However, buyers should remember that purchasing a Rolex primarily for investment carries risks. Market values fluctuate, and long-term appreciation is never guaranteed. The greatest value comes from owning and enjoying a beautifully engineered timepiece.


How to Buy a Rolex Explorer

Purchasing a Rolex Explorer requires careful research. Authorized Rolex retailers remain the safest place to buy a brand-new watch, ensuring authenticity and manufacturer warranty coverage.

Due to high demand, waiting lists may exist for certain Explorer models. Patience is often necessary when purchasing directly from authorized dealers.

Many buyers also explore the certified pre-owned market. Reputable dealers inspect and authenticate their inventory, providing confidence when purchasing older or discontinued references.

Before completing any purchase, verify the watch’s condition, service history, paperwork, serial numbers, and original accessories. These factors significantly influence both value and future resale potential.


Caring for Your Rolex Explorer

Although the Rolex Explorer is built for durability, regular maintenance helps preserve its appearance and performance.

Cleaning the watch periodically with a soft cloth and mild soap removes dirt, sweat, and oils that accumulate during daily wear. Avoid using harsh chemicals that could damage the finish.

Rolex recommends professional servicing at appropriate intervals to maintain optimal movement performance. Qualified technicians inspect seals, lubricate internal components, and test accuracy to ensure the watch continues operating at peak performance.

Proper storage also matters. Keeping the Explorer in a protective watch box when not in use reduces unnecessary scratches and minimizes exposure to dust and humidity.


Rolex Explorer vs. Other Rolex Sports Watches

Many buyers compare the Explorer with other Rolex sports models before making a purchase.

Compared to the Rolex Submariner, the Explorer offers a cleaner and more minimalist appearance. While the Submariner is designed specifically for diving, the Explorer serves as an all-purpose adventure watch suitable for everyday life.

When compared with the Rolex GMT-Master II, the Explorer sacrifices additional time-zone functionality in exchange for greater simplicity. Travelers who need multiple time zones may prefer the GMT-Master II, while those seeking a straightforward daily companion often choose the Explorer.

Against the Rolex Oyster Perpetual, the Explorer provides enhanced ruggedness, stronger historical significance, and sport-oriented features without becoming overly complicated.


Final Thoughts

The Rolex Explorer remains one of the finest examples of practical luxury watchmaking. Its rich history, exceptional craftsmanship, reliable movement, and timeless design have allowed it to remain relevant for more than seventy years.

Rather than relying on flashy complications or extravagant styling, the Explorer succeeds through balance, durability, and everyday usability. It represents everything that has made Rolex one of the world’s most respected watch manufacturers.

Whether you’re an experienced collector, a first-time luxury watch buyer, or someone who simply appreciates outstanding engineering, the Rolex Explorer deserves serious consideration. Its ability to transition effortlessly from mountain trails to business meetings demonstrates why it continues to be regarded as one of the most versatile and enduring watches ever created.

Rolex Oyster Perpetual: Everything You Need to Know About Rolex’s Iconic Timepiece

Introduction

The Rolex Oyster Perpetual is one of the most recognizable luxury watches in the world. Known for its timeless design, outstanding craftsmanship, and exceptional reliability, this watch has become a favorite among collectors, professionals, and first-time luxury watch buyers alike. Unlike many other luxury watches that focus on complicated features, the Oyster Perpetual keeps things simple while maintaining the highest standards of quality.

For decades, Rolex has built a reputation for producing watches that combine innovation with elegance. The Oyster Perpetual perfectly represents this philosophy by offering a clean design, durable construction, and precise movement. Whether you’re wearing it to a business meeting or a casual gathering, it complements almost any outfit.

If you’re considering buying your first Rolex or simply want to understand why the Oyster Perpetual is so highly respected, this guide covers everything you need to know—from its history and features to pricing, maintenance, and investment value.


The History of the Rolex Oyster Perpetual

The Rolex Oyster Perpetual has a rich history that dates back nearly a century. In 1926, Rolex introduced the Oyster case, which became the world’s first waterproof wristwatch case. This groundbreaking innovation revolutionized the watch industry and established Rolex as a leader in durability and engineering.

A few years later, Rolex developed the Perpetual self-winding movement. This automatic mechanism eliminated the need for manual winding by using the natural movement of the wearer’s wrist. Combining the Oyster case with the Perpetual movement created the legendary Oyster Perpetual collection.

Over the years, Rolex has continuously refined the Oyster Perpetual while maintaining its original identity. Modern versions feature updated materials, improved movements, and vibrant dial colors, yet they still preserve the timeless aesthetic that has made the watch famous worldwide.


Design and Build Quality

One of the biggest strengths of the Rolex Oyster Perpetual is its understated design. Unlike many luxury watches with flashy bezels or complicated displays, the Oyster Perpetual embraces simplicity. Its clean dial, polished finish, and classic hour markers create a look that never goes out of style.

The watch is crafted from Rolex’s proprietary Oystersteel, a highly corrosion-resistant stainless steel commonly used in aerospace applications. This premium material helps the watch maintain its shine while resisting scratches and daily wear.

Another standout feature is the Oyster bracelet. Designed for comfort and durability, it offers a secure fit while maintaining an elegant appearance. Combined with the waterproof Oyster case and scratch-resistant sapphire crystal, the overall build quality is among the best in the luxury watch market.


Key Features of the Rolex Oyster Perpetual

The Rolex Oyster Perpetual is powered by Rolex’s in-house automatic movement, which is certified as a Superlative Chronometer. This certification guarantees outstanding precision, reliability, and long-term performance beyond standard chronometer requirements.

Another impressive feature is its water resistance. Thanks to the Oyster case and Twinlock winding crown, most Oyster Perpetual models offer water resistance up to 100 meters. This makes the watch suitable for everyday activities, including swimming and light water sports.

Rolex also equips the watch with a scratch-resistant sapphire crystal and a highly efficient power reserve of approximately 70 hours on newer models. These technical improvements ensure that the Oyster Perpetual remains dependable even if it’s not worn every day.


Different Sizes and Dial Options

One reason for the popularity of the Rolex Oyster Perpetual is the variety of sizes available. Depending on the generation, buyers can find models ranging from 28mm to 41mm, making it suitable for nearly every wrist size and personal preference.

Rolex has also expanded its dial color selection significantly. Traditional colors like black, silver, and blue remain popular, while brighter options such as turquoise, coral red, green, and yellow have attracted a younger audience and increased collector interest.

The minimal dial layout allows each color to stand out beautifully. Without additional complications like date windows or chronographs, the design remains clean, balanced, and highly legible.


Why the Rolex Oyster Perpetual Is So Popular

The Oyster Perpetual appeals to both experienced collectors and newcomers because it offers the purest Rolex experience. It contains everything that makes Rolex famous—precision, reliability, and exceptional craftsmanship—without unnecessary complications.

Another reason for its popularity is versatility. Whether paired with a suit, jeans, or business casual attire, the watch always looks appropriate. Few luxury watches transition so effortlessly between formal and casual settings.

Additionally, the Oyster Perpetual often serves as an entry point into the Rolex brand. While still considered a luxury purchase, it is generally more affordable than collections like the Submariner, GMT-Master II, or Daytona, making it highly desirable.


Is the Rolex Oyster Perpetual a Good Investment?

Many luxury watches appreciate in value, and the Rolex Oyster Perpetual has proven to be one of the strongest performers in recent years. Limited production, increasing global demand, and Rolex’s reputation contribute to strong resale values for many models.

Certain dial colors have become particularly collectible. Bright turquoise, coral red, and discontinued versions have experienced significant appreciation in the secondary market due to limited availability and high demand among enthusiasts.

However, buyers should remember that purchasing a Rolex should primarily be about enjoying the watch. While investment potential exists, market conditions can fluctuate, and not every model will increase dramatically in value.


How to Choose the Right Rolex Oyster Perpetual

Before purchasing an Oyster Perpetual, consider your preferred case size. Smaller models provide a classic vintage appearance, while larger versions offer a more modern wrist presence.

Dial color is another important factor. Neutral colors like black, silver, and blue are timeless and versatile, whereas colorful dials provide a more unique and fashionable look.

Finally, decide whether to buy from an authorized dealer or the pre-owned market. Authorized dealers provide manufacturer warranties, while reputable pre-owned sellers may offer discontinued or difficult-to-find models.


Caring for Your Rolex Oyster Perpetual

Proper maintenance helps preserve both the appearance and performance of your Rolex. Regularly cleaning the watch with warm water, mild soap, and a soft cloth removes dirt and oils that accumulate during everyday wear.

Although Rolex watches are built to withstand daily use, it’s still wise to avoid severe impacts, harsh chemicals, and extreme magnetic environments whenever possible. These precautions help protect the movement and exterior finish.

Rolex recommends professional servicing every several years, depending on usage and condition. Having the watch serviced by qualified Rolex technicians ensures that the movement remains accurate and all waterproof seals continue to function properly.


Common Mistakes to Avoid When Buying

One common mistake is purchasing from unknown sellers offering unusually low prices. Counterfeit Rolex watches have become increasingly sophisticated, making it essential to buy from trusted dealers with verified authenticity.

Another mistake is ignoring the watch’s documentation. Original boxes, warranty cards, receipts, and service records often increase resale value and provide confidence in the watch’s authenticity.

Finally, avoid making your decision based solely on investment potential. The best Rolex is the one you’ll genuinely enjoy wearing for years rather than simply storing in hopes of future appreciation.


Final Thoughts

The Rolex Oyster Perpetual represents everything that has made Rolex one of the world’s most respected watch manufacturers. Its combination of timeless design, exceptional craftsmanship, reliable automatic movement, and everyday versatility makes it an outstanding choice for both new buyers and experienced collectors.

Whether you’re looking for your first luxury watch or adding another masterpiece to your collection, the Oyster Perpetual delivers lasting value beyond its price tag. Its elegant appearance, durable construction, and proven reliability ensure that it remains relevant generation after generation.

In the world of luxury watches, trends may come and go, but the Rolex Oyster Perpetual continues to stand as a symbol of quality, precision, and timeless style. For anyone seeking a watch that can be worn every day while holding its prestige for decades, the Oyster Perpetual remains one of the finest choices available.

Christopher McDonald: A Complete Look at the Veteran Actor’s Career, Movies, and Lasting Hollywood Legacy

0

Introduction

Christopher McDonald is one of those actors whose face almost everyone recognizes, even if they don’t immediately remember his name. With a career spanning more than four decades, he has appeared in countless films, television series, and stage productions, consistently delivering memorable performances. Whether he’s playing an intimidating villain, a charismatic businessman, or a comedic rival, McDonald has built a reputation as one of Hollywood’s most dependable character actors.

Many fans instantly associate Christopher McDonald with his unforgettable portrayal of Shooter McGavin in Happy Gilmore. However, limiting his career to that single role would overlook an impressive body of work that includes dramas, action films, thrillers, political series, and family entertainment. His versatility has allowed him to remain relevant through changing trends in the entertainment industry.

In this article, we’ll take an in-depth look at Christopher McDonald’s early life, acting journey, career highlights, most famous roles, television appearances, personal life, and why he continues to be one of Hollywood’s most respected supporting actors.


Early Life and Background

Christopher McDonald was born on February 15, 1955, in New York City, USA. Growing up in a large family, he developed an interest in storytelling and performing at a young age. His parents encouraged creativity, which eventually inspired him to pursue acting professionally.

He attended Hobart College in Geneva, New York, where he studied before fully committing himself to acting. During his college years, McDonald became involved in theater productions, sharpening the skills that would later define his successful career. Like many aspiring actors, he spent years auditioning and working tirelessly before earning significant opportunities.

Unlike overnight celebrities, Christopher McDonald’s success came through persistence. He gradually built his resume with television appearances, supporting film roles, and theater performances. This slow but steady path gave him valuable experience and established him as a reliable performer capable of handling a wide range of characters.


How Christopher McDonald Started His Acting Career

Christopher McDonald began appearing in television shows during the late 1970s and early 1980s. His natural confidence on screen helped him secure guest roles in popular series, allowing audiences and casting directors to notice his talent.

As his experience grew, filmmakers recognized his ability to portray authoritative figures, corporate executives, military officers, politicians, and memorable villains. His expressive face, commanding voice, and confident body language made him particularly effective in these types of roles.

Rather than chasing leading-man status, McDonald embraced character acting. This decision ultimately worked in his favor because it opened doors to a diverse range of productions. Over time, he became one of Hollywood’s most recognizable supporting actors, appearing alongside many of the industry’s biggest stars.


Christopher McDonald’s Breakthrough Role

Although Christopher McDonald had already appeared in several films before the mid-1990s, his biggest breakthrough came in 1996 with the comedy Happy Gilmore. In the film, he portrayed Shooter McGavin, an arrogant professional golfer determined to stop Adam Sandler’s unconventional character from winning the championship.

Shooter McGavin quickly became one of the most iconic comedy villains in modern film history. McDonald perfectly balanced confidence, humor, competitiveness, and over-the-top arrogance, creating a character audiences still quote decades later.

What makes the performance remarkable is its lasting popularity. Even today, Shooter McGavin remains one of the internet’s favorite movie characters, regularly appearing in memes, social media posts, and discussions about the greatest comedy antagonists ever created. Christopher McDonald’s performance turned what could have been a simple rival into a legendary character.


Best Christopher McDonald Movies

Christopher McDonald has appeared in dozens of films across multiple genres. While many viewers know him from comedy, his filmography demonstrates impressive versatility.

One of his earliest notable appearances came in Thelma & Louise, where he portrayed Darryl Dickinson. Although not the central character, his performance contributed significantly to the story’s emotional dynamics.

He also appeared in acclaimed films such as Quiz Show, Broken Flowers, Spy Kids 2, Spy Kids 3-D: Game Over, Requiem for a Dream, and numerous independent productions. Each role showcased different aspects of his acting ability, proving he could comfortably move between drama, comedy, suspense, and family entertainment.

Throughout his career, Christopher McDonald has never limited himself to one genre. This willingness to accept varied roles has helped him remain consistently employed while earning respect from directors and audiences alike.


Christopher McDonald on Television

Television has played a significant role in Christopher McDonald’s career. Over the years, he has appeared in an impressive list of popular TV series, often portraying memorable guest characters or recurring roles.

His television credits include appearances in crime dramas, political thrillers, sitcoms, medical series, and legal dramas. Viewers have seen him in productions such as Law & Order, The Good Wife, Boardwalk Empire, Harry’s Law, Hacks, and many others.

Unlike some actors who struggle to transition between film and television, McDonald has thrived in both formats. His adaptability allows him to fit naturally into ensemble casts while making every character feel authentic and memorable.


What Makes Christopher McDonald Such a Great Character Actor?

One of Christopher McDonald’s greatest strengths is his versatility. He can convincingly portray an intimidating executive, a corrupt politician, a caring father, or a hilarious comedic rival without making any performance feel repetitive.

His facial expressions and vocal delivery add tremendous personality to every role. Even when appearing for only a few scenes, McDonald often leaves a lasting impression because he fully commits to every character.

Another reason for his longevity is professionalism. Directors frequently praise experienced character actors who arrive prepared, understand the script, and elevate scenes without overshadowing the main cast. Christopher McDonald has earned that reputation throughout his career, making him a favorite choice for filmmakers.


Christopher McDonald Beyond Happy Gilmore

While Shooter McGavin remains his signature role, Christopher McDonald has consistently demonstrated that he offers much more than one famous character.

He has successfully balanced blockbuster films, independent cinema, television dramas, voice acting, and stage performances. His willingness to explore different projects has kept his career fresh and prevented him from becoming permanently typecast.

Fans who only know him from Happy Gilmore are often surprised by the depth of his dramatic performances. Whether playing serious authority figures or emotionally complex characters, McDonald proves he possesses remarkable range beyond comedy.


Personal Life and Family

Despite decades in Hollywood, Christopher McDonald has maintained a relatively private personal life. He has been married for many years and is known as a dedicated family man who values time away from the spotlight.

Unlike many celebrities, McDonald rarely seeks media attention outside of promoting his work. Instead, he prefers letting his performances speak for themselves. This approach has helped him maintain a positive reputation within the entertainment industry.

He has also participated in charity work and industry events throughout his career, supporting causes important to him while remaining approachable and respected among colleagues.


Christopher McDonald’s Lasting Impact on Hollywood

Few actors enjoy careers lasting more than forty years while remaining consistently active. Christopher McDonald has accomplished exactly that by combining talent, adaptability, and professionalism.

His influence extends beyond individual performances. Younger actors often study experienced character performers like McDonald to understand how supporting roles can become just as memorable as leading performances.

The continued popularity of Shooter McGavin also demonstrates the lasting cultural impact of his work. Decades after Happy Gilmore premiered, new generations continue discovering the character through streaming platforms and social media, ensuring Christopher McDonald’s legacy remains strong.


Why Audiences Still Love Christopher McDonald

One reason Christopher McDonald remains popular is his consistency. Audiences know they can expect a polished, entertaining performance whenever he appears on screen.

Another factor is his ability to make even unlikeable characters enjoyable to watch. Whether portraying an arrogant businessman or an overconfident athlete, he brings enough charisma and humor to keep viewers engaged.

Additionally, nostalgia plays a significant role. Fans who grew up watching films from the 1990s and early 2000s often remember McDonald as a familiar face in many of their favorite movies. As those films continue attracting new audiences, his popularity remains remarkably strong.


Christopher McDonald’s Career Shows the Value of Character Acting

Hollywood often celebrates leading actors, but Christopher McDonald’s career reminds audiences how important great character actors truly are. Supporting performers frequently shape the tone of a film, create memorable conflicts, and deliver unforgettable scenes.

McDonald has mastered this craft by consistently bringing energy, intelligence, and authenticity to every role. Rather than relying on celebrity status, he has built his reputation through excellent performances and unwavering professionalism.

His extensive filmography demonstrates that success in Hollywood isn’t always measured by starring roles. Sometimes, lasting influence comes from becoming the actor everyone remembers long after the credits roll.


Conclusion

Christopher McDonald has earned his place among Hollywood’s most respected and recognizable character actors. From his early television appearances to his unforgettable role as Shooter McGavin and his countless film and television performances, he has consistently demonstrated exceptional talent and versatility.

His ability to transition effortlessly between comedy, drama, action, and thriller genres has allowed him to enjoy a career spanning more than four decades. While many actors experience brief periods of fame, Christopher McDonald has built something far more impressive—a lasting legacy based on skill, professionalism, and memorable performances.

Whether you’re discovering his work for the first time or revisiting classic films, it’s easy to understand why Christopher McDonald continues to be admired by audiences, directors, and fellow actors alike. His career serves as a reminder that great character actors are often the true foundation of unforgettable storytelling, and his contributions to film and television will continue to entertain audiences for many years to come.

Shopify App Store: The Complete Guide to Finding the Best Apps for Your Online Store

Introduction

Running a successful Shopify store involves much more than listing products and waiting for customers to make purchases. As your business grows, you’ll likely need additional features to improve marketing, customer service, inventory management, shipping, and overall user experience. This is where the Shopify App Store becomes an essential resource.

The Shopify App Store is a marketplace filled with thousands of applications designed specifically for Shopify merchants. Whether you’re a beginner launching your first online store or an established brand managing thousands of orders each month, there’s an app that can simplify your workflow and help you increase sales.

In this guide, we’ll explore everything you need to know about the Shopify App Store, including how it works, its benefits, the most popular app categories, tips for choosing the right apps, and best practices for keeping your store fast and efficient.


What Is the Shopify App Store?

The Shopify App Store is Shopify’s official marketplace where merchants can discover, install, and manage third-party applications that extend the functionality of their online stores.

Unlike traditional eCommerce platforms that require extensive coding to add new features, Shopify allows users to install apps with just a few clicks. These apps integrate directly with your store and provide solutions for everything from email marketing to accounting and customer support.

Today, the Shopify App Store hosts thousands of apps created by both Shopify and independent developers. Every app goes through Shopify’s review process to ensure it meets security and performance standards before becoming available to merchants.

The marketplace continues to grow every year as developers create innovative tools that help online businesses stay competitive in an increasingly crowded eCommerce landscape.


Why the Shopify App Store Is Important

One of Shopify’s biggest strengths is its flexibility. While the core platform provides everything needed to build an online store, every business has unique requirements. The Shopify App Store fills those gaps by offering customizable solutions.

Instead of hiring developers to build custom software, merchants can install ready-made apps that solve specific problems. This saves both time and money while allowing businesses to scale much faster.

Another major advantage is automation. Many Shopify apps automate repetitive tasks like sending abandoned cart emails, updating inventory, generating invoices, or syncing products across multiple sales channels. Automation helps store owners focus on growing their business instead of managing routine operations.

The availability of professional tools also means even small businesses can access enterprise-level features without investing heavily in custom development.


Popular Categories in the Shopify App Store

The Shopify App Store offers applications across dozens of categories, making it easy to find solutions tailored to your business needs.

Marketing Apps

Marketing apps help attract visitors and convert them into customers. These tools include email marketing platforms, SMS campaigns, pop-ups, social media integrations, referral programs, and loyalty rewards.

Many merchants use marketing apps to automate promotional campaigns, segment customers, and improve customer retention through personalized messaging.

These apps can significantly increase revenue while reducing the manual effort involved in managing marketing campaigns.

SEO Apps

Search engine optimization is critical for driving organic traffic. SEO apps help merchants optimize meta titles, descriptions, image alt text, structured data, and page speed.

Many SEO apps also scan websites for technical issues, identify broken links, and provide recommendations for improving search rankings.

For businesses focused on long-term growth, SEO apps are often among the most valuable investments available in the Shopify App Store.

Inventory Management Apps

As businesses grow, managing inventory becomes increasingly complex.

Inventory apps help track stock levels across multiple warehouses, synchronize inventory between marketplaces, forecast demand, and automate purchase orders.

These features reduce the risk of overselling while improving operational efficiency.

Customer Support Apps

Customer experience plays a major role in eCommerce success.

Support apps offer live chat, AI chatbots, help desks, FAQ builders, ticket management, and customer communication tools.

Quick responses improve customer satisfaction while increasing trust and repeat purchases.

Shipping and Fulfillment Apps

Shipping apps simplify order fulfillment by calculating shipping rates, printing labels, tracking packages, and integrating with courier services.

Many apps also automate shipping notifications, giving customers real-time updates about their orders.

This improves transparency while reducing customer support inquiries.


Benefits of Using Shopify Apps

One of the biggest benefits of the Shopify App Store is convenience. Most apps can be installed in minutes without requiring technical expertise.

Another advantage is scalability. As your store grows, you can easily add new features instead of rebuilding your website from scratch. Whether you need subscription billing, wholesale pricing, or multilingual support, there’s usually an app available.

Apps also improve productivity by automating repetitive tasks. Instead of manually sending emails or updating spreadsheets, automation handles these processes in the background.

Finally, Shopify apps help improve customer satisfaction through better shopping experiences, personalized recommendations, faster checkout, and improved communication.


How to Choose the Right Shopify Apps

With thousands of options available, selecting the right apps requires careful evaluation.

First, clearly define your business goals. Are you trying to increase conversions, improve SEO, automate inventory, or enhance customer service? Knowing your objectives helps narrow your choices.

Next, read customer reviews carefully. Apps with consistently high ratings and positive feedback are generally more reliable. Pay attention to comments about customer support, ease of use, and long-term performance.

Pricing is another important consideration. Some apps offer free plans with limited features, while others charge monthly subscription fees. Always compare pricing with the value the app provides before making a decision.

Lastly, check whether the developer regularly updates the app. Frequent updates indicate active maintenance and better compatibility with Shopify’s latest features.


Best Practices for Managing Shopify Apps

Installing too many apps can negatively impact your store’s performance.

Every installed app may add scripts or code that increases page loading times. A slower website can reduce customer satisfaction and negatively affect SEO rankings.

Regularly audit your installed apps and remove those you no longer use. Keeping only essential applications helps maintain a faster and cleaner store.

It’s also a good idea to monitor app permissions. Only install trusted apps that request access relevant to their functionality.

Testing your website after installing new apps ensures there are no compatibility issues with your existing theme or other installed applications.


Common Mistakes to Avoid

Many beginners install multiple apps that perform similar functions. This creates unnecessary costs and may even cause conflicts between applications.

Another common mistake is choosing apps solely because they’re free. While free apps can be excellent, premium apps often provide better support, more features, and improved reliability.

Ignoring customer reviews is another error. Reviews often reveal hidden issues related to bugs, slow support, or poor performance.

Finally, don’t overlook app speed. An app with numerous features isn’t always the best choice if it significantly slows down your website.


The Future of the Shopify App Store

The Shopify App Store continues to evolve alongside the broader eCommerce industry.

Artificial intelligence is becoming increasingly common, with apps offering AI-powered product recommendations, automated customer support, content generation, and personalized shopping experiences.

Automation is also expanding. More apps now integrate with accounting software, CRM systems, marketplaces, and fulfillment services, allowing businesses to manage operations from a centralized platform.

Security and privacy are receiving greater attention as well. Developers are creating apps that help merchants comply with changing data protection regulations while maintaining customer trust.

As Shopify continues introducing new platform features, developers will keep building innovative apps that make running an online business easier than ever.


Tips for Getting Maximum Value from the Shopify App Store

Rather than installing numerous apps immediately, start with only the tools that solve your most pressing challenges. This keeps your store organized and avoids unnecessary monthly expenses.

Take advantage of free trials whenever possible. Testing an app in your own store allows you to evaluate its performance before committing to a paid subscription.

Review your app stack every few months. Your business needs will change as you grow, and some apps may become unnecessary while others become essential.

Finally, stay informed about newly released apps. The Shopify ecosystem evolves rapidly, and innovative solutions are constantly entering the marketplace that could save time, reduce costs, or increase sales.


Conclusion

The Shopify App Store is one of the platform’s greatest strengths, giving merchants access to thousands of powerful tools that can transform a basic online store into a highly optimized eCommerce business. From marketing and SEO to shipping, inventory, analytics, and customer support, there is an app available for nearly every business requirement.

However, success isn’t about installing as many apps as possible. It’s about choosing the right combination of reliable, high-quality applications that align with your business goals. By carefully evaluating reviews, monitoring performance, and regularly auditing your installed apps, you can create a faster, smarter, and more profitable Shopify store.

Whether you’re launching your very first Shopify website or scaling an established online brand, the Shopify App Store provides the flexibility and functionality needed to compete in today’s fast-moving eCommerce industry. With the right apps supporting your business, you’ll be better equipped to improve customer experiences, streamline operations, and achieve sustainable long-term growth.

Shopify Careers: A Complete Guide to Building a Successful Future at Shopify

Introduction

If you’re searching for a rewarding career in the technology industry, Shopify careers should definitely be on your radar. Shopify has become one of the world’s leading e-commerce platforms, helping millions of businesses build and grow their online stores. As the company continues to expand globally, it consistently looks for talented professionals who are passionate about innovation, customer success, and technology.

Working at Shopify isn’t just about having a prestigious name on your resume. It’s about joining a company that encourages creativity, remote work, continuous learning, and personal growth. Whether you’re a software engineer, marketer, customer support specialist, designer, or data analyst, Shopify offers numerous career opportunities across multiple departments.

In this guide, we’ll explore everything you need to know about Shopify careers—from available job roles and company culture to employee benefits, hiring tips, and ways to increase your chances of getting hired.


Why Shopify Is a Great Place to Work

Shopify has earned a strong reputation as one of the most employee-friendly technology companies. Instead of focusing only on profits, the company invests heavily in its people, creating an environment where employees feel valued and motivated.

One of Shopify’s biggest strengths is its flexible work culture. Many positions are fully remote, allowing employees to work from anywhere while maintaining a healthy work-life balance. This flexibility has made Shopify particularly attractive to professionals who prefer remote careers over traditional office jobs.

Another reason people pursue Shopify careers is the company’s commitment to innovation. Employees are encouraged to experiment with new ideas, solve meaningful problems, and contribute to products that impact millions of merchants worldwide. This creates exciting opportunities to develop both technical and leadership skills.


Types of Shopify Careers Available

Shopify hires professionals from many different backgrounds. While software development remains one of its largest departments, there are plenty of opportunities outside engineering.

Software engineers are responsible for developing and improving Shopify’s platform. These professionals work on everything from payment systems and APIs to security, artificial intelligence, and mobile applications. Developers with experience in Ruby, React, JavaScript, or cloud technologies often find excellent opportunities here.

Customer support specialists help merchants solve technical issues, improve their stores, and understand Shopify’s tools. Strong communication skills and problem-solving abilities are especially important for these positions, making them ideal for individuals who enjoy helping others.

Marketing professionals, product managers, UX designers, content creators, recruiters, finance experts, and cybersecurity specialists are also in high demand. As Shopify expands globally, it continues adding roles that support its growing merchant ecosystem.


Skills That Help You Get Hired at Shopify

Although each role has different requirements, there are several skills that consistently stand out during the hiring process.

Technical expertise is obviously important for engineering positions. Candidates should have strong programming knowledge, understand modern development practices, and demonstrate problem-solving abilities through previous projects or portfolios.

Communication skills are equally valuable. Shopify employees collaborate across multiple teams and often work remotely, making clear written and verbal communication essential. Being able to explain ideas effectively is just as important as having technical knowledge.

Adaptability also plays a significant role. Shopify moves quickly and frequently introduces new technologies, products, and internal processes. Candidates who enjoy continuous learning and can adapt to changing environments tend to thrive within the company.


Shopify’s Remote Work Culture

One feature that makes Shopify careers especially appealing is the company’s remote-first approach. Rather than requiring employees to commute daily, Shopify has embraced distributed teams that work from different parts of the world.

Remote work offers employees greater flexibility, improved productivity, and better work-life balance. Many professionals appreciate the opportunity to organize their work schedules while avoiding lengthy daily commutes.

However, remote work also requires discipline. Successful Shopify employees manage their time effectively, communicate proactively, and remain connected with teammates through virtual meetings and collaboration tools. Shopify provides the technology and resources needed to make remote collaboration seamless.


Employee Benefits at Shopify

Beyond competitive salaries, Shopify offers a comprehensive benefits package designed to support employee well-being.

Health and wellness programs help employees maintain both physical and mental health. Depending on location, benefits may include medical insurance, wellness allowances, counseling resources, and fitness reimbursements.

Professional development is another major focus. Shopify encourages employees to continue learning through training programs, educational resources, conferences, and mentorship opportunities. This investment helps employees advance their careers while strengthening the company.

Many employees also enjoy generous vacation policies, parental leave, retirement plans where applicable, and various employee assistance programs. These benefits contribute to Shopify’s reputation as an employer that genuinely cares about its workforce.


How the Shopify Hiring Process Works

The hiring process at Shopify is designed to identify candidates who not only possess the necessary skills but also align with the company’s values.

The process typically begins with an online application where candidates submit their resumes and sometimes portfolios. Tailoring your resume to match the job description can significantly improve your chances of moving forward.

Selected applicants usually participate in recruiter interviews followed by technical assessments, case studies, or practical assignments depending on the role. Engineering candidates may complete coding exercises, while marketing applicants could be asked to analyze campaign strategies.

The final stage often includes interviews with hiring managers and potential team members. These conversations evaluate technical expertise, communication skills, collaboration style, and overall fit within Shopify’s culture.


Tips for Landing a Shopify Job

Preparing carefully before applying can make a noticeable difference.

First, research Shopify thoroughly. Understand its products, mission, recent innovations, and merchant-focused approach. Demonstrating genuine interest during interviews helps distinguish you from other candidates.

Second, customize your resume for every application. Highlight relevant achievements using measurable results whenever possible. Employers appreciate candidates who demonstrate real impact instead of simply listing responsibilities.

Finally, build a strong online presence. Maintain an updated LinkedIn profile, showcase projects on GitHub if you’re a developer, and create a portfolio if you’re applying for design, content, or marketing positions. A professional online profile often strengthens your application considerably.


Career Growth Opportunities at Shopify

One reason professionals stay with Shopify is the opportunity for long-term career development.

Employees regularly gain access to challenging projects that expand their expertise. Instead of remaining in one role indefinitely, many professionals move into leadership positions or transition between departments as their interests evolve.

Shopify also encourages internal mobility. Employees can explore new opportunities within the company, allowing them to diversify their experience without changing employers. This flexibility helps retain talented individuals while supporting continuous learning.

Mentorship, peer collaboration, and regular performance feedback contribute to a workplace where employees can steadily improve their skills and prepare for future leadership opportunities.


Common Challenges of Working at Shopify

Like any fast-growing technology company, Shopify presents its own set of challenges.

The company’s rapid pace means employees must adapt quickly to changing priorities. New products, evolving technologies, and shifting business goals require flexibility and a willingness to learn continuously.

Remote work, while beneficial, can sometimes create communication challenges. Employees must proactively stay connected with teammates and maintain effective collaboration across different time zones.

Additionally, Shopify maintains high performance expectations. While this environment helps drive innovation, it also requires employees to remain organized, motivated, and committed to delivering quality work consistently.


Is Shopify the Right Career Choice for You?

Choosing the right employer depends on your personal goals, preferred work environment, and career aspirations.

If you enjoy solving complex problems, working with talented professionals, and contributing to products used by millions of businesses, Shopify can be an excellent career destination. The company’s innovative culture offers meaningful work that directly impacts entrepreneurs around the world.

Professionals who value flexibility will especially appreciate Shopify’s remote-first philosophy. Rather than measuring success by office attendance, Shopify emphasizes results, collaboration, and continuous improvement.

However, candidates should also be comfortable with change, fast-paced environments, and ongoing learning. Those qualities are essential for succeeding within one of the world’s leading technology companies.


Conclusion

Shopify careers offer far more than traditional technology jobs. They provide opportunities to work on innovative products, collaborate with talented professionals, and build meaningful solutions that empower millions of entrepreneurs worldwide. From software engineering and product management to marketing, customer support, and operations, Shopify offers diverse career paths for professionals with different backgrounds and skill sets.

The company’s strong remote culture, excellent employee benefits, commitment to continuous learning, and focus on innovation make it one of the most attractive employers in the tech industry. While the hiring process can be competitive, candidates who prepare thoroughly, develop relevant skills, and demonstrate a genuine passion for helping merchants succeed have a much stronger chance of standing out.

Whether you’re just beginning your career or looking for your next professional challenge, exploring Shopify careers could be one of the best decisions you make. With dedication, continuous learning, and the right preparation, you can position yourself for long-term success at one of the world’s most influential e-commerce companies.

Shopify Support: The Complete Guide to Getting Fast and Reliable Help for Your Online Store

Introduction

Running a successful Shopify store is exciting, but it also comes with its fair share of challenges. Whether you’re setting up your first online shop or managing thousands of daily orders, there will eventually come a time when you need assistance. That’s where Shopify support becomes an essential part of your business journey.

Shopify has earned its reputation as one of the world’s leading eCommerce platforms because it not only provides powerful tools for selling online but also offers multiple support options for merchants. From technical troubleshooting to billing questions and app-related issues, Shopify’s support system is designed to help store owners solve problems efficiently.

In this guide, we’ll explore everything you need to know about Shopify support, including the available support channels, common issues, best practices for getting help faster, and tips for solving problems on your own. By the end of this article, you’ll have a clear understanding of how to make the most of Shopify’s customer support resources.


What Is Shopify Support?

Shopify support is the customer assistance system provided by Shopify to help merchants manage, troubleshoot, and improve their online stores. It covers everything from store setup and account management to technical errors, payment processing, shipping settings, and integrations.

The support team works alongside Shopify’s extensive documentation, community forums, and educational resources to ensure merchants have multiple ways to find answers. Whether you’re facing a simple question or a complex technical issue, there’s usually a support option available that fits your needs.

One of the reasons Shopify remains popular among entrepreneurs is its commitment to customer success. Instead of leaving merchants to solve problems independently, Shopify provides guided assistance and continually updates its support resources to match the platform’s latest features.


Different Ways to Contact Shopify Support

One of Shopify’s biggest strengths is offering several methods for merchants to receive help. Depending on the nature of your issue, one support channel may be more suitable than another.

Live chat is often the fastest option for most users. It allows merchants to communicate directly with a support representative in real time. This method is ideal for urgent questions, account issues, or troubleshooting problems that require immediate attention.

The Shopify Help Center is another valuable resource. It contains thousands of detailed articles, tutorials, setup guides, and troubleshooting instructions. Many common issues can be resolved simply by following these step-by-step guides without needing to contact customer support.

Additionally, Shopify maintains active community forums where experienced merchants and Shopify experts share advice. These discussions often include practical solutions based on real-world experience, making the community an excellent place to find answers to unique business challenges.


Common Problems Shopify Support Can Help Solve

Every online business faces occasional technical or operational challenges. Shopify support is equipped to assist with a wide variety of issues that merchants encounter throughout their business journey.

Store setup problems are among the most common requests. New users frequently need assistance with domain connections, theme customization, payment gateway configuration, shipping settings, or tax setup. Shopify’s support team can guide merchants through each step to ensure everything works correctly.

Payment and checkout issues are another frequent concern. Whether customers are experiencing failed transactions, delayed payouts, or payment gateway errors, Shopify support can help identify the cause and recommend appropriate solutions.

Technical issues involving apps, themes, or third-party integrations also make up a significant portion of support requests. Since many stores rely on multiple apps to extend functionality, occasional conflicts may occur. Shopify support can help identify whether the issue originates from Shopify itself or from an external application.


How to Get Faster Responses from Shopify Support

While Shopify support is generally responsive, merchants can improve their experience by preparing useful information before reaching out. This saves time and allows support agents to diagnose problems more quickly.

Start by clearly describing the issue. Instead of saying “my store isn’t working,” explain exactly what happened, when it started, what error messages appear, and what troubleshooting steps you’ve already tried. Specific information helps support representatives narrow down possible causes much faster.

Including screenshots is another effective strategy. Visual evidence often explains technical issues better than written descriptions alone. Error messages, checkout problems, broken layouts, or payment failures become much easier to understand when accompanied by screenshots.

Finally, keep your store information readily available. Your store URL, order numbers, customer details (when applicable), and app names can all help Shopify support investigate your issue more efficiently and reduce unnecessary back-and-forth communication.


Benefits of Using Shopify Support

Having access to professional support provides peace of mind for every online business owner. Instead of spending hours searching for answers across the internet, merchants can rely on official guidance directly from Shopify.

Accurate information is one of the biggest advantages. Since Shopify regularly updates its platform with new features and improvements, official support agents provide recommendations based on the latest version of the software rather than outdated tutorials found elsewhere online.

Reliable support also minimizes downtime. Every minute your online store experiences technical problems can potentially lead to lost sales. Quick assistance helps restore normal operations faster and protects your business revenue.

Perhaps most importantly, Shopify support gives merchants confidence to experiment with new features. Knowing expert help is available encourages store owners to explore advanced customization, marketing tools, and integrations without worrying about getting stuck.


Self-Help Resources Available for Shopify Users

Not every problem requires contacting customer support. Shopify offers a wide collection of educational resources that empower merchants to solve many issues independently.

The Shopify Help Center is the first place many experienced users visit. It contains detailed documentation covering nearly every feature available on the platform. Whether you’re learning about SEO, shipping profiles, discount codes, or inventory management, chances are you’ll find a comprehensive guide.

Shopify Academy provides free educational content for merchants who want to improve their eCommerce skills. Courses cover topics like marketing, branding, product photography, customer service, and business growth strategies.

The Shopify Community Forum is another valuable learning resource. Thousands of merchants actively discuss challenges, share success stories, and provide practical solutions based on firsthand experience. Often, someone else has already encountered—and solved—the exact issue you’re facing.


Tips for Avoiding Common Shopify Problems

Although support is always available, preventing issues before they occur is even better. Following a few best practices can significantly reduce the likelihood of encountering technical problems.

Regularly update your themes and apps whenever developers release new versions. Updates often include security improvements, bug fixes, and compatibility enhancements that help maintain a stable store environment.

Before making major design changes or installing multiple apps, test everything carefully. Introducing several modifications at once makes it difficult to identify the source of problems if something goes wrong. Testing one change at a time provides much better control.

Maintaining organized documentation also helps. Keep records of important settings, installed apps, custom code modifications, and integrations. If an issue occurs later, you’ll have a clearer understanding of recent changes that may have contributed to the problem.


Why Quality Shopify Support Matters for Business Growth

Excellent customer support isn’t just about fixing technical issues—it directly contributes to long-term business success. Every hour saved troubleshooting can instead be spent improving products, marketing campaigns, or customer relationships.

Growing businesses depend on stable infrastructure. As order volumes increase and customer expectations rise, reliable support becomes increasingly valuable. Quick access to knowledgeable experts helps merchants maintain a smooth shopping experience even during busy sales periods.

Strong support also encourages innovation. Business owners feel more comfortable expanding internationally, introducing subscription services, or implementing advanced automation when they know experienced professionals are available if challenges arise.

Ultimately, Shopify support becomes more than just a troubleshooting service—it serves as a trusted partner throughout the growth of your online business.


Conclusion

Shopify support plays a vital role in helping merchants build, manage, and grow successful online stores. Whether you’re a beginner launching your first product or an experienced entrepreneur scaling a thriving business, having reliable support available can make a significant difference.

By understanding the different support channels, preparing your questions effectively, and taking advantage of Shopify’s extensive self-help resources, you’ll be able to resolve issues faster and keep your business running smoothly. Combining official support with proactive store management ensures fewer interruptions and a better experience for both you and your customers.

As eCommerce continues to evolve, Shopify remains committed to providing merchants with the tools, knowledge, and assistance needed to succeed. Learning how to use Shopify support effectively is an investment that will benefit your online business for years to come.